Articles
How To Build Roof Trusses
Modified: December 7, 2023
Learn the step-by-step process of building roof trusses with our comprehensive articles. Discover expert tips and tricks to ensure a sturdy and efficient roofing structure.
(Many of the links in this article redirect to a specific reviewed product. Your purchase of these products through affiliate links helps to generate commission for Storables.com, at no extra cost. Learn more)
Introduction
Building roof trusses is a crucial step in constructing a sturdy and well-supported roof for any residential or commercial building. Trusses are triangular structures that provide a framework to support the weight of the roof and distribute it evenly to the walls and foundation. They are designed to be strong, durable, and cost-effective.
In this article, we will discuss the process of building roof trusses, including the types of trusses commonly used, the materials and tools needed, and step-by-step instructions on how to calculate, cut, assemble, and install roof trusses. By following these guidelines, you will be able to construct reliable and efficient roof trusses that ensure the structural integrity of your building.
Before we dive into the details, it’s essential to understand the importance of quality roof trusses. A well-built roof not only provides protection from the elements but also contributes to the overall aesthetic appeal and value of a property. Therefore, it’s crucial to invest time and effort in constructing trusses that meet industry standards and adhere to local building codes.
While the process of building roof trusses may seem daunting, with the right information and tools at your disposal, you can successfully complete this task. Whether you are a seasoned DIY enthusiast or a professional contractor, this article will serve as a comprehensive guide to help you build roof trusses effectively and efficiently.
So, let’s dive in and explore the different types of roof trusses commonly used in construction, the materials and tools required for the project, and the step-by-step process to build and install them.
Key Takeaways:
- Building roof trusses is a detailed process that involves selecting the right type of truss, calculating precise measurements, and assembling and installing the trusses with accuracy to ensure a sturdy and reliable roof structure.
- Attention to detail, adherence to building codes, and proper securing and bracing techniques are essential for constructing a durable and aesthetically pleasing roof. Regular maintenance and inspections are crucial for long-term roof performance.
Read more: How To Build Roof Trusses For A Shed
Types of Roof Trusses
When it comes to constructing roof trusses, there are several different types that can be used, depending on the design requirements and structural needs of the building. Each type of truss offers unique benefits and advantages. Let’s explore some of the most commonly used roof truss designs:
- King Post Truss: This type of truss consists of a single vertical post positioned in the center, with diagonal beams extending from the post to the top chords of the truss. King post trusses are simple and cost-effective, making them a popular choice for smaller buildings and residential structures with shallow roof spans.
- Queen Post Truss: Similar to the king post truss, the queen post truss features two vertical posts positioned on either side of the center. Diagonal beams extend from the posts to the top chords, offering increased stability and load-bearing capacity. These trusses are commonly used in larger residential buildings and light commercial structures.
- Scissor Truss: With an arched design, the scissor truss is known for its aesthetic appeal and exceptional interior ceiling height. This type of truss features two sloping chords that cross each other at the apex, creating a vaulted ceiling effect. Scissor trusses are often utilized in residential buildings, churches, and other structures that require a spacious and visually appealing interior.
- Gable Truss: A gable truss is a simple yet effective design that consists of two symmetrical sloping chords connected by vertical members. These trusses are commonly used in buildings with gable roofs, providing support and stability to the roof structure. Gable trusses are versatile and can be easily adapted for various roof pitches.
- Mono Truss: Mono trusses are single-span trusses that are commonly used in lean-to roofs or as part of larger truss systems. These trusses feature a single sloping chord connected to a vertical member, providing stability and support to the roof structure.
It’s important to note that the selection of the appropriate roof truss design will depend on factors such as the size and shape of the building, the planned use of the space, the desired roof pitch, and the design preferences of the architect or homeowner.
Now that we have explored the different types of roof trusses, let’s move on to the materials and tools you will need for the construction process.
Materials and Tools Required
Before you begin building roof trusses, it’s important to gather all the necessary materials and tools to ensure a smooth and efficient construction process. Here is a list of the materials and tools you will need:
Materials:
- Lumber: Choose high-quality lumber that is suitable for your truss design and meets local building codes. The size and dimensions of the lumber will vary based on the span and load requirements of your roof.
- Connector Plates: These metal plates are used to join the truss members together. They provide strength and stability to the truss structure. Ensure you have an adequate supply of connector plates that are compatible with your truss design.
- Nails and Screws: You will need an assortment of nails and screws to secure the truss components together. Select nails and screws that are appropriate for the type of lumber you are using.
- Brackets and Hardware: Depending on your truss design, you may require additional brackets and hardware to reinforce certain connections or add extra support.
- Roof Sheathing: Once the trusses are installed, you will need roof sheathing material, such as plywood or oriented strand board (OSB), to provide a solid base for your roof covering.
- Roofing Material: The final layer of your roof will be the roofing material, such as shingles, tiles, or metal sheets. Choose a material that suits your aesthetic preferences and climate conditions.
Tools:
- Tape Measure: A tape measure is essential for taking accurate measurements of the truss components.
- Circular Saw or Miter Saw: You will need a saw to cut the truss members to the required lengths and angles. A circular saw or miter saw is commonly used for this purpose.
- Hammer or Nail Gun: Depending on your preference, you can use a traditional hammer or a nail gun to drive nails into the truss components.
- Drill: A drill is necessary for pre-drilling pilot holes and driving screws into the truss members.
- Clamps: Clamps are helpful for holding the truss components together during assembly.
- Safety Gear: Don’t forget to wear safety equipment such as gloves, safety glasses, and ear protection to protect yourself during the construction process.
By ensuring you have all the necessary materials and tools before starting the construction process, you can work efficiently and minimize any delays or interruptions. Now that you have everything ready, let’s move on to calculating the measurements for your trusses.
Read more: How To Build Gambrel Shed Roof Truss
Calculating Truss Measurements
Accurate measurements are crucial when building roof trusses to ensure they fit properly and provide the necessary structural support. Calculating the measurements involves determining the length and angles of the truss components. Here are the steps to calculate truss measurements:
- Design and Plan: Start by determining the desired roof pitch and span. Consider factors such as local building codes, climate conditions, and the size and shape of your building. These factors will help determine the appropriate design and dimensions for your trusses.
- Determine the Overhang: Decide on the desired overhang of your roof. The overhang refers to the extension of the roof beyond the walls of the building. This will affect the measurements of the bottom chord of the truss.
- Calculate the Span: Measure the distance between the inside edges of the supporting walls to determine the span of your trusses. The span will influence the length of the top chord and the placement of the internal web members.
- Calculate the Bottom Chord Length: The bottom chord of the truss will be longer than the span, taking into consideration the desired overhang. Add the span measurement to twice the overhang measurement to find the total length of the bottom chord.
- Determine the Pitch Angle: The pitch angle is the angle at which the top chords slope. The most common pitch angles are four-in-twelve (4/12) or six-in-twelve (6/12), which means the roof rises four or six inches for every twelve inches of horizontal run. Determine the pitch angle based on the design and aesthetic preferences.
- Calculate the Top Chord Length: Use the span measurement and the pitch angle to calculate the length of the top chord. The length can be calculated using basic trigonometry functions or by utilizing online calculators and software designed for truss calculations.
- Calculate the Web Members: The web members are the angled beams that connect the top and bottom chords. The number and placement of web members will depend on the design and span of your trusses. Ensure the web members are positioned evenly along the length of the truss for optimal strength and stability.
It’s important to note that these calculations provide a general guideline, and it’s recommended to consult with a structural engineer or truss manufacturer to ensure the accuracy of your measurements. Once you have the measurements calculated, you can move on to cutting and preparing the truss components.
Cutting and Preparing Truss Components
Once you have calculated the measurements for your roof trusses, the next step is to cut and prepare the truss components. This process involves cutting the lumber to the correct lengths and angles as per the calculated measurements. Here is a step-by-step guide on how to cut and prepare the truss components:
- Gather the Necessary Materials and Tools: Ensure you have all the required materials, including lumber, connector plates, and appropriate tools such as a saw, tape measure, and clamps. Safety equipment should also be worn during this process.
- Cut the Bottom Chord: Measure and mark the length of the bottom chord on the lumber based on the calculated measurement. Use a saw to make the necessary cuts, ensuring straight and accurate lines. Repeat this process for all the bottom chord components.
- Cut the Top Chord: Measure and mark the length of the top chord on the lumber, accounting for the pitch angle. Use a saw to make the angled cuts on the top chords, ensuring they align correctly with the bottom chords. Take care to maintain the correct angle throughout the cuts.
- Prepare the Web Members: Measure and mark the length of the web members on the lumber based on the calculated measurements. Use a saw to make the necessary cuts, ensuring straight and accurate lines. Take care to maintain the correct angle for each web member.
- Cut and Position Connector Plates: Connector plates are used to join the truss components together. Measure and mark the appropriate positions for the connector plates on the truss components. Use a saw to cut slots or notches to accommodate the connector plates.
- Assemble the Truss Components: Once all the truss components are cut and prepared, it’s time to assemble them. Lay out the bottom chord, top chord, and web members in the correct positions, ensuring they align properly. Insert the connector plates into the slots or notches and secure them with nails or screws.
- Recheck Measurements and Adjustments: After assembling the truss components, double-check all the measurements and angles to ensure accuracy. Make any necessary adjustments before moving on to the next step.
By following these steps, you can cut and prepare the truss components with precision and accuracy. Once the components are ready, you can proceed to the next stage of truss assembly.
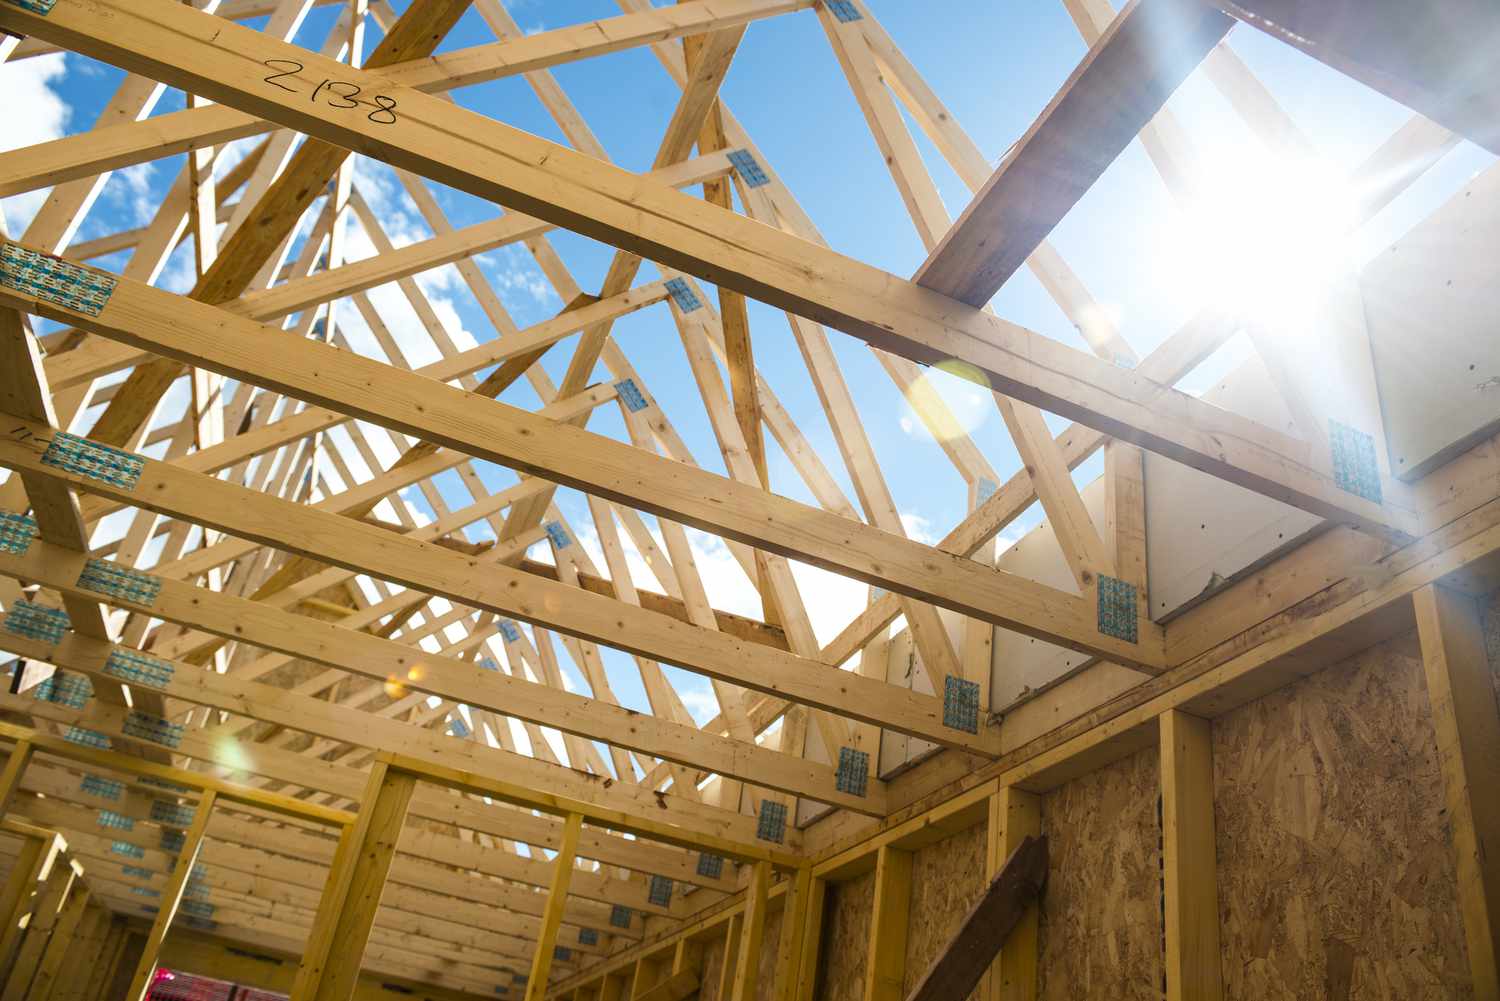
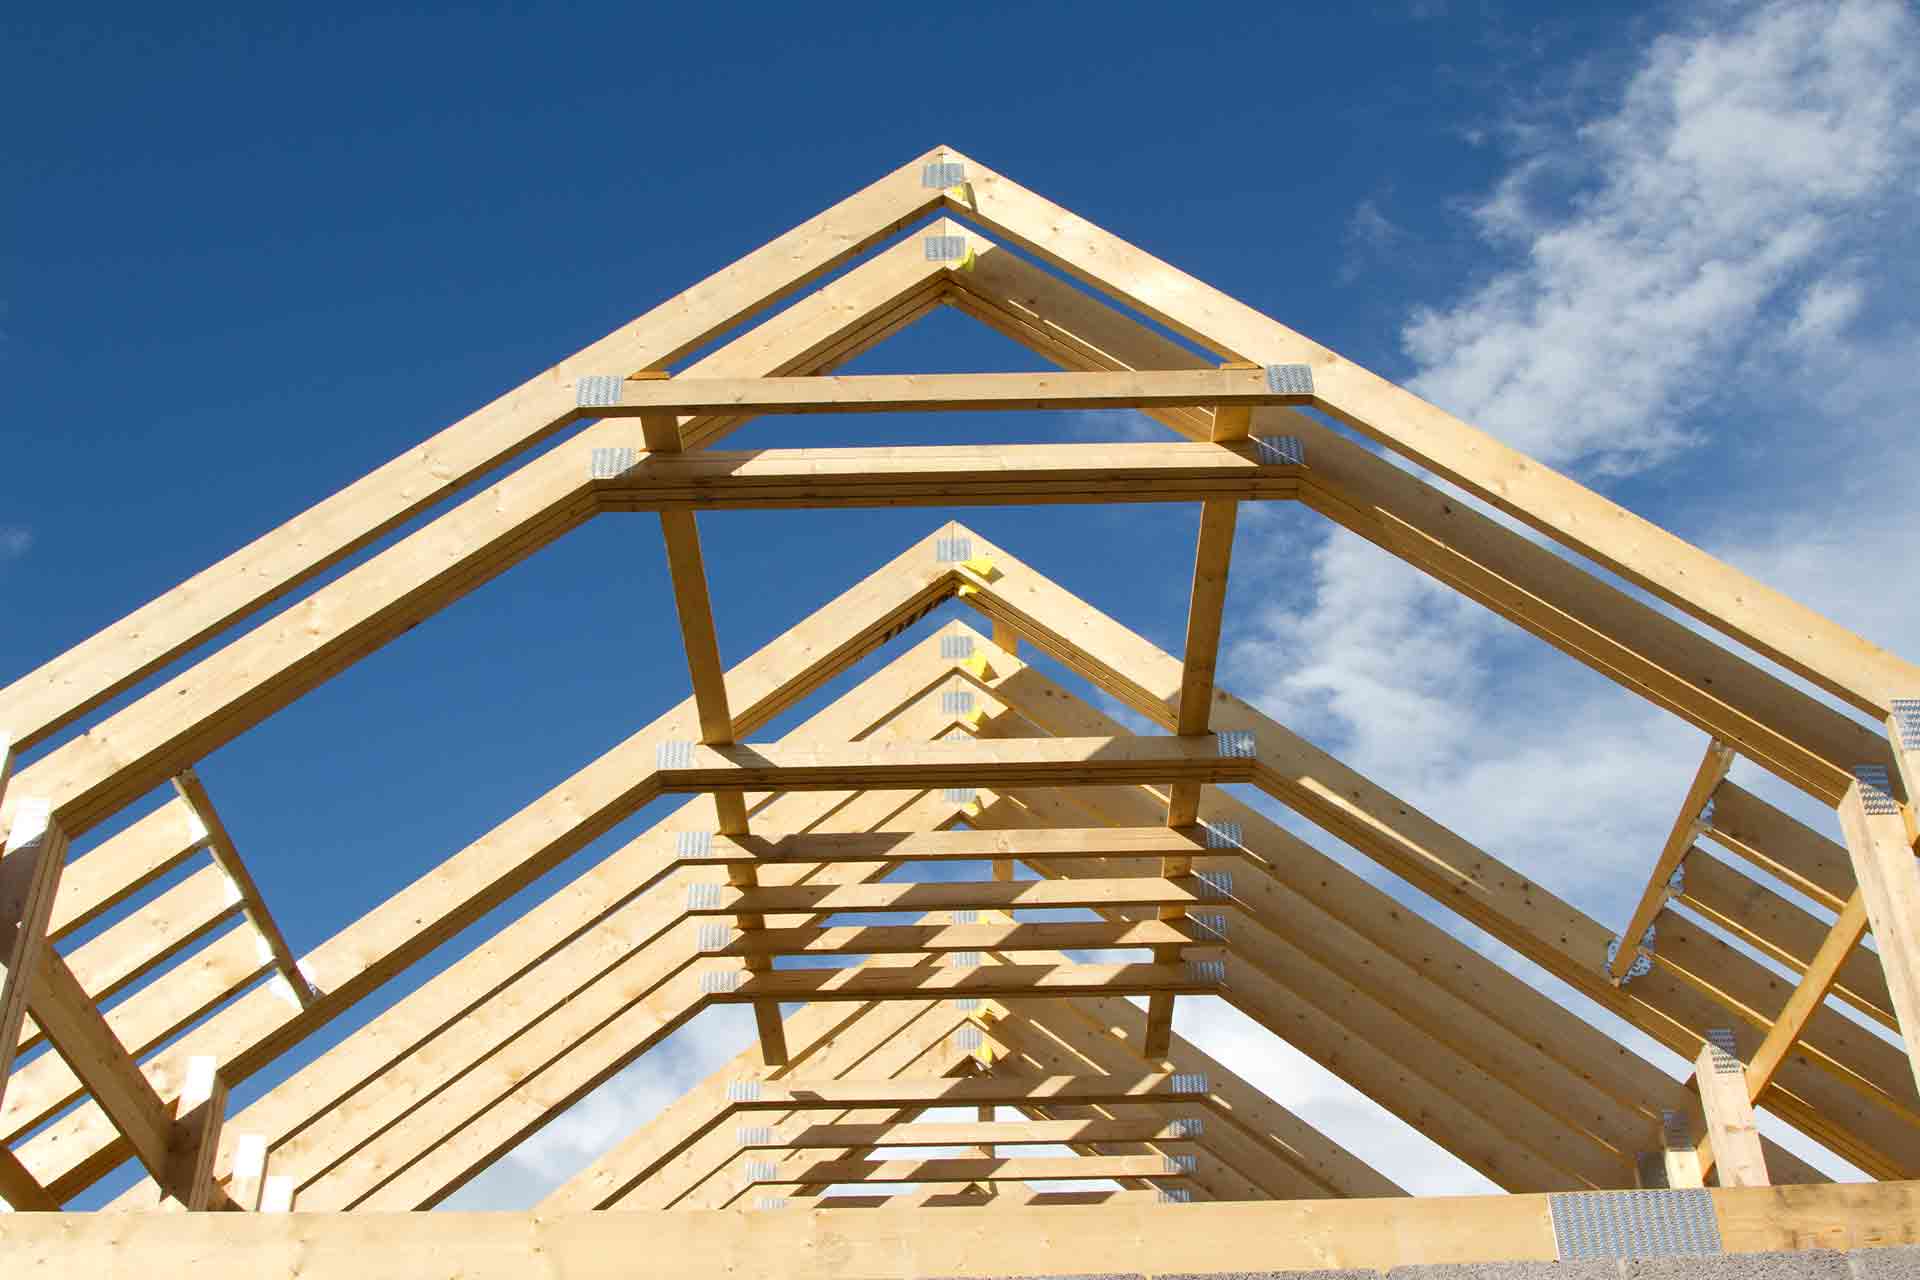
Assembling the Trusses
Now that you have cut and prepared the truss components, it’s time to assemble them to create the truss structure. Assembling the trusses requires careful positioning and secure attachment of the components to ensure structural integrity. Here is a step-by-step guide on how to assemble the trusses:
- Prepare the Work Area: Clear a spacious and flat surface where you can lay out the truss components. Ensure you have enough room to maneuver and assemble the trusses comfortably.
- Lay Out the Bottom Chord: Start by laying out the bottom chord of the truss on the work surface. Ensure the components are positioned correctly, and the measurements and angles match the calculated specifications.
- Add Web Members: Place the web members onto the bottom chord, aligning them with the notch or slot in the connector plates. Ensure that the web members are evenly spaced along the length of the truss for optimal strength and stability.
- Attach the Top Chord: Carefully position the top chord onto the web members, aligning it with the notches or slots in the connector plates. Ensure that the top chord fits snugly and aligns with the bottom chord.
- Secure the Connections: Once all the truss components are in position, secure the connections by driving nails or screws through the notch or slot in the connector plates. Make sure the connections are tight and secure to ensure the structural integrity of the trusses.
- Check for Accuracy: After assembling each truss, double-check all the measurements and angles to ensure accuracy. Make any necessary adjustments to ensure that each truss is built correctly and matches the calculated specifications.
- Repeat the Process: Continue assembling the remaining trusses using the same steps. Take your time and pay attention to detail to ensure that each truss is constructed accurately and consistently.
Assembling the trusses requires focus, precision, and attention to detail. By following these steps and taking the time to ensure accuracy, you can create sturdy and reliable trusses that will support the weight of the roof effectively.
Once you have completed the assembly process, the next step is to install the trusses onto the building structure. In the following section, we will discuss the process of installing the roof trusses.
When building roof trusses, make sure to accurately measure and cut the lumber to the specified dimensions to ensure a strong and stable structure. Double-check all angles and connections for accuracy before securing the trusses in place.
Installing Roof Trusses
Installing the roof trusses is a critical step in the construction process, as it provides the structural framework for the roof. Proper installation ensures stability, load-bearing capacity, and overall safety. Here is a step-by-step guide on how to install roof trusses:
- Prepare the Work Area: Before installing the trusses, ensure the work area is clear of any debris or obstacles. It should provide enough space to maneuver the trusses safely.
- Mark the Truss Placement: Use a chalk line or marking tool to mark the exact placement of each truss on the top plate of the walls. This will help guide the installation process and ensure accurate positioning.
- Position the Trusses: Lift each truss into position by using lifting equipment or assistance from others. Carefully align the truss with the marked placement on the top plate, ensuring it rests securely on the wall plates.
- Secure Trusses to the Walls: Once the truss is in position, use nails or screws to secure the truss to the top plate of the walls. Ensure that the truss is plumb and aligned correctly before fastening it in place. Repeat this step for each truss.
- Connect Adjacent Trusses: Connect adjacent trusses using metal connector plates or other approved techniques. Make sure the connections are properly aligned and secure to maintain the structural integrity of the roof system.
- Align and Adjust Trusses: Check the alignment of each truss as you go, making any necessary adjustments to ensure that they are straight and level. This will contribute to the overall stability and appearance of the roof.
- Brace the Trusses: Install temporary bracing to hold the trusses in place and maintain their position before permanent bracing is installed. This will help prevent movement during the construction process.
- Inspect for Quality and Stability: Once the trusses are installed, conduct a thorough inspection to ensure they are securely fastened, properly aligned, and stable. Address any issues or concerns before proceeding to the next steps of the roofing process.
It’s important to consult the manufacturer’s guidelines, as well as local building codes and regulations, when installing roof trusses. Adhering to these guidelines will ensure proper installation and compliance with safety standards.
After installing the trusses, the next step is to secure and brace them to provide additional support. In the following section, we will discuss the importance of securing and bracing the trusses.
Read more: What Is A Roof Truss
Securing and Bracing the Trusses
Securing and bracing the roof trusses is crucial to ensure the stability and structural integrity of the roof system. Proper securing and bracing techniques minimize the risk of movement, sagging, or collapse, particularly during adverse weather conditions. Here are the steps to secure and brace the roof trusses:
- Install Permanent Bracing: Once the roof trusses are in place, install permanent bracing to provide additional support and prevent lateral movement. Diagonal brace members should be positioned diagonally across the trusses and secured using nails or screws at each intersection. This bracing helps distribute the load evenly and enhances the overall strength of the roof structure.
- Add Lateral Bracing: Install lateral bracing between the trusses to further stabilize the roof system. Lateral braces should be positioned horizontally, connecting adjacent trusses at mid-height. These braces help prevent side-to-side movement and increase the overall rigidity of the truss system.
- Secure the Bottom Chords: Nails or screws should be used to secure the bottom chords of the trusses to the wall plates or supporting beams. Ensure that the connections are firm and strong to maintain the stability of the trusses.
- Inspect Connections: Thoroughly inspect all connections and junctions, including connector plates, braces, and fasteners. Check for any loose or damaged components and make any necessary repairs or replacements. It’s crucial to ensure that all connections are secure and reliable.
- Consult Local Building Codes: Always consult local building codes and regulations to ensure compliance with specific requirements for securing and bracing roof trusses. Building codes may dictate specific bracing methods or provide additional guidelines to ensure the safety and stability of the roof system.
Securing and bracing the roof trusses is a critical step to safeguard the structural integrity and longevity of the roof. It is essential to follow proper installation techniques and adhere to local building codes to ensure a strong and stable roof system.
Once the trusses are secured and braced, the next step is to proceed with roof sheathing and other finishing touches. We will discuss this process in the following section.
Roof Sheathing and Finishing Touches
Roof sheathing is a crucial step in the construction process as it provides a solid base for the roof covering and helps distribute the weight evenly across the trusses. Additionally, there are several finishing touches that need to be implemented for a complete and functional roof. Here are the steps for roof sheathing and finishing touches:
- Prepare the Roof Sheathing Material: Cut the roof sheathing material, such as plywood or oriented strand board (OSB), to the appropriate dimensions to fit the roof surface. Ensure that the pieces are properly aligned and have straight, clean edges.
- Install the Roof Sheathing: Begin by installing the first sheet of roof sheathing along one edge of the roof, ensuring that it aligns with the eaves and trusses. Attach the sheathing securely using nails or screws, following the recommended spacing provided by the manufacturer. Continue this process, working your way up the roof, until all the sheathing is properly installed.
- Seal Joints: Apply a sealant or adhesive to seal the joints between the roof sheathing sheets to prevent moisture penetration. This will help maintain the integrity and durability of the roof structure.
- Install Drip Edge and Flashing: Install drip edge along the eaves and rakes of the roof to provide a neat, finished edge and direct water away from the fascia. Install flashing around roof penetrations, such as chimneys or vents, to prevent water infiltration and ensure a watertight seal.
- Install Underlayment: Install a layer of roofing underlayment over the roof sheathing to provide an additional barrier against moisture and improve the overall weather resistance of the roof system. Follow the manufacturer’s instructions for proper installation techniques.
- Roof Ventilation: Install roof ventilation components, such as ridge vents or soffit vents, to ensure proper air circulation and prevent heat buildup in the attic. Adequate ventilation helps control moisture, improves energy efficiency, and extends the lifespan of the roof.
- Apply Roof Covering: Install the chosen roofing material, such as shingles, tiles, or metal sheets, according to the manufacturer’s guidelines. Follow proper installation techniques to ensure a durable, weather-resistant, and aesthetically pleasing roof covering.
- Final Inspections: Conduct a final inspection of the roof to ensure that all components are properly installed, secured, and aligned. Check for any visible defects, loose fasteners, or other issues that need to be addressed before completing the roofing project.
By following these steps, you can effectively complete the roof sheathing process and add the necessary finishing touches to create a functional, durable, and visually appealing roof. It’s important to consult local building codes and manufacturer’s instructions throughout the process to ensure compliance and achieve a high-quality result.
With the roof sheathing and finishing touches complete, you have successfully constructed a solid and reliable roof structure. It’s important to maintain regular roof inspections and perform necessary maintenance to maximize the lifespan and performance of your roof.
Conclusion
Building roof trusses is an essential part of constructing a sturdy and reliable roof for any residential or commercial building. By following the steps outlined in this article, you can successfully build and install roof trusses that provide structural integrity and support for your roof system.
We discussed the various types of roof trusses commonly used, including king post trusses, queen post trusses, scissor trusses, gable trusses, and mono trusses. Each type has its own benefits and is suitable for different architectural designs and structural requirements.
We also explored the materials and tools required for the construction process. High-quality lumber, connector plates, nails, screws, and other hardware are necessary to ensure the strength and stability of the trusses. Additionally, the right tools such as saws, drills, and clamps are essential for accurate and precise cuts and assembly.
Calculating truss measurements is a crucial step in ensuring that the trusses fit properly. By accounting for span, overhang, pitch angle, and other design considerations, you can determine the appropriate lengths and angles for the truss components.
Cutting and preparing truss components requires attention to detail and accurate measurements. You must carefully cut the lumber to the correct lengths and angles as per the calculated measurements. Preparing the truss components involves notching or slotting the lumber for connector plates and ensuring all components are properly aligned.
Assembling the trusses involves laying out the bottom chord, adding the web members, positioning the top chord, and connecting the components using connector plates. Accurate measurements and secure connections are essential to maintain the trusses’ stability and strength.
After the trusses are assembled, they must be properly installed on the building structure by securing them to the wall plates and positioning them according to the marked placement. Additional bracing is necessary to provide stability and prevent movement during the construction process.
Roof sheathing and finishing touches, such as installing roof sheathing, drip edge, flashing, and underlayment, help create a solid foundation for the roof covering. The roof covering, whether it is shingles, tiles, or metal sheets, provides protection from the elements and adds aesthetic appeal to the building.
Following these steps and adhering to building codes and regulations ensures the construction of a well-built roof that will withstand the test of time. Regular maintenance and inspections are essential to keep the roof in excellent condition and address any issues before they escalate.
Building roof trusses may seem like a daunting task, but with the right knowledge, tools, and attention to detail, it is a manageable process. Whether you are a seasoned DIY enthusiast or a professional contractor, this comprehensive guide has provided the necessary information to build strong and durable roof trusses.
Remember, safety should always be a top priority. Take necessary precautions, wear protective gear, and consult professionals or experts when needed. By building your roof trusses with care and precision, you can ensure a reliable and long-lasting roof structure for your building.
Frequently Asked Questions about How To Build Roof Trusses
Was this page helpful?
At Storables.com, we guarantee accurate and reliable information. Our content, validated by Expert Board Contributors, is crafted following stringent Editorial Policies. We're committed to providing you with well-researched, expert-backed insights for all your informational needs.


0 thoughts on “How To Build Roof Trusses”